Building a Modern Blog with Eleventy 3.x (Liquid Edition)
This is a complete, hands-on guide to building a real blog with Eleventy (also called 11ty), a static site generator: a tool that takes plain files, Markdown posts, HTML templates, some data, and turns them into a finished set of HTML pages you can host anywhere. There's no database and no server-side code running once it's built, just files, which makes the result fast and simple to deploy.

By the end of this tutorial you'll have an actual working blog, built in two parts.
Part 1 gets you a complete, working site:
- A homepage and an about page
- A blog section with working post URLs
- A navigation menu
- Images
- Tag/category pages
Part 2 is a menu of optional add-ons you can pick from afterward, or skip entirely:
- An RSS feed
- A sitemap
- On-site search
- SEO tags (including JSON-LD)
- A couple of smaller extras
Every command and every file is explained as it comes up, so you're not just copy-pasting, you'll know what each piece is doing and why it's there. It uses Liquid as the template language throughout (more on what that means once we get there), and matches Eleventy 3.1.6, the current stable release.
Here's the full project structure you'll have by the end of Part 2, for reference. Part 1 alone only needs a subset of this, we'll point out what's optional as we go:
my-blog/
├── eleventy.config.js
├── package.json
└── src/
    ├── _data/
    │   └── site.json
    ├── _includes/
    │   ├── layouts/
    │   │   ├── base.liquid
    │   │   ├── post.liquid
    │   │   └── gallery.liquid
    │   └── partials/
    │       └── jsonld.liquid
    ├── css/
    │   └── style.css
    ├── js/
    │   └── main.js
    ├── images/
    │   └── ...
    ├── posts/
    │   ├── posts.11tydata.js
    │   ├── my-first-post.md
    │   └── a-second-post.md
    ├── gallery/
    │   ├── gallery.json
    │   └── sunset-hike.md
    ├── index.liquid
    ├── about.liquid
    ├── blog.liquid
    ├── tags.liquid
    ├── gallery.liquid
    └── sitemap.liquid
Part 1: Build the Blog
1. Prerequisites
You need Node.js installed. This is the piece of software that lets JavaScript run outside of a browser, and it's what Eleventy itself is built with. Grab the current LTS version from nodejs.org if you don't have it, or check the Installing JavaScript docs for supported versions. A recent LTS (20.19 or newer) keeps things simplest for this tutorial.
You'll also need a terminal and a code editor.
- The terminal (also called a command line or shell) is a text-based way to talk to your computer, instead of clicking icons, you type commands. On macOS it's the app called Terminal, on Windows it's PowerShell or Command Prompt, and on Linux it's usually just called Terminal too.
- A code editor is where you'll write and edit files like
eleventy.config.jsand your blog posts. VS Code is free and the most common choice, and it happens to have a terminal built into it (View → Terminal), so you can do both from one window if you'd rather not juggle two apps.
You don't need either open yet, we'll say explicitly when to switch between them as we go.
2. Project Setup
Step 1: Pick a spot on your computer, and open a terminal there.
Decide where this project will live, somewhere like your Desktop or Documents folder is fine. Open your terminal, and use cd (short for "change directory") to navigate there. For example, if you want the project inside your Documents folder:
cd Documents
Step 2: Create the project folder and move into it.
mkdir my-blog
cd my-blog
mkdir my-blogcreates a new, empty folder calledmy-bloginside wherever your terminal currently is.cd my-blogmoves your terminal into that folder, so any command you run next happens inside it, not next to it. (You'll sometimes see these combined asmkdir my-blog && cd my-blog, the&&just means "and then run the next command.")
Everything from here on assumes your terminal is sitting inside my-blog. This folder is what we mean by the "project root" whenever it comes up later.
Step 3: Turn this folder into an npm project.
npm init -y
npm (Node Package Manager) is the tool that installs and manages JavaScript packages, like Eleventy itself. This command creates a file called package.json in your project folder. Think of package.json as your project's ID card and packing list: it records the project's name, which packages it depends on, and any shortcut commands (called "scripts") you want to be able to run. You didn't have this file a second ago, npm init just generated it. The -y flag tells npm to accept all the default answers instead of asking you a series of setup questions.
Step 4: Install Eleventy.
npm install --save-dev @11ty/eleventy
This downloads Eleventy and puts it inside a new folder called node_modules (npm creates this automatically, don't edit anything inside it, and don't worry about its contents). It also adds a line to the package.json you just created, under a "devDependencies" section, recording that your project needs Eleventy. "Dev dependency" just means a tool you need while building the site, as opposed to something the finished, deployed website needs to run. You'll also notice a new package-lock.json file appear; npm manages that one for you automatically too, you never need to edit it by hand.
At this point, if you open the my-blog folder in your file explorer or in VS Code, you'll see: package.json, package-lock.json, and node_modules/. Nothing else yet, we haven't told Eleventy anything about our site.
Step 5: Switch to your code editor, and create eleventy.config.js yourself.
Unlike package.json, this file does not get created for you, you write it by hand. Open the my-blog folder in your code editor, create a new file at the top level (the project root) named exactly eleventy.config.js, and put this inside it:
module.exports = function (eleventyConfig) {
  return {
    dir: {
      input: "src",
      includes: "_includes",
      data: "_data",
      output: "_site",
    },
  };
};
Eleventy automatically looks for a file with this exact name when it runs, so naming matters here. What this particular config says: look for your source files in a folder called src (which doesn't exist yet either, you'll create it as you add pages), and write the finished, built website out to a folder called _site. The includes and data lines tell Eleventy where, inside src, to find your layout/partial files and your global data files respectively, we'll create both of those folders shortly.
- Create a folder called
srcin your project rootmy-blog/.
Step 6: Add shortcut commands to package.json.
Open package.json in your editor. You'll see a "scripts" section that npm generated with a placeholder in it. Mine looks like this:
"scripts": {
    "test": "echo \"Error: no test specified\" && exit 1"
  },
replace it with:
  "scripts": {
    "start": "npx @11ty/eleventy --serve",
    "build": "npx @11ty/eleventy"
  }
These are just nicknames for longer commands. npx @11ty/eleventy runs the copy of Eleventy that lives in your node_modules folder (rather than requiring you to type out that whole path). The --serve flag additionally starts a local preview server and rebuilds the site automatically whenever you save a file. Because these are named "start" and "build" inside the "scripts" section, you get to type the short version from your terminal: npm start or npm run build.
When to actually run it: you won't have any pages yet, so there's nothing to preview. Once you've created your first page in the next section, switch back to your terminal (still inside my-blog) and run:
npm start
If it is successful you should see the build command expand to the command we gave in the package.json. It should look like this: npm start
> [email protected] start
> npx @11ty/eleventy --serve

[11ty] Wrote 0 files in 0.11 seconds (v3.1.6)
[11ty] Watching…
[11ty] Server at http://localhost:8080/
Leave that running, and open http://localhost:8080/ in your browser or whatever url appears in case you use a different port.
It should show an empty page with an error message
Cannot GET /
This is expected because we haven't created any pages yet, it simply means there is no page to display at our current location. Every time you save a file in your editor, this will rebuild the site and refresh automatically. Come back to the terminal only when you need to install a new package or stop the server with (Ctrl+C for windows or Cmd+C for Mac users).
3. Global Site Data
Just like eleventy.config.js, this next file is one you create yourself, Eleventy doesn't generate it. In your editor, inside your src folder (create src now if you haven't yet), create a folder called _data, and inside that, a file called site.json with 4 fields; title, description, url, and author:
{
  "title": "My Blog",
  "description": "Thoughts on code and coffee.",
  "url": "https://example.com",
  "author": "Your Name"
}
Here's the mechanism: back in eleventy.config.js, we set data: "_data", which tells Eleventy "look inside src/_data/ for global data files." Eleventy then takes every file it finds in there and makes it available in every template automatically, using the filename (minus the extension) as the variable name. Since this file is called site.json, everything inside it becomes reachable as site.title, site.description, site.url, and site.author in any page or layout you write, no importing required. Adding a second file, say nav.json, would similarly become available as nav.*.
If you need more info later you can check Docs: Global Data Files
A Note on File Types: HTML, Liquid, and Markdown
This section is optional and gives context. Before writing your first page, it's worth clearing up something that trips a lot of people up: which file extension goes where, and whether they're interchangeable.
.liquid and .html are effectively the same thing here. Eleventy pre-processes plain .html files using the Liquid engine by default, the same engine that processes .liquid files. That means every {{ }} and {% %} tag you'll see in this tutorial would work identically if you renamed base.liquid to base.html. We use the .liquid extension throughout mainly for clarity, so it's visually obvious at a glance that a file contains template logic and front matter, not because Eleventy requires it.
.md (Markdown) files are different, and more capable than they look. They still get front matter and Liquid tags processed, exactly like a .liquid file, but the body content additionally gets run through a Markdown-to-HTML converter. That's why a post's body can be written as ## A heading or **bold text** and come out as proper <h2> and <strong> tags. You can also drop raw HTML directly into a Markdown file when you need something Markdown syntax doesn't cover (an embedded <iframe>, for instance), it passes through untouched.
So, can you mix and match?
- Markdown file as a layout? Technically Eleventy will let you, but it's not practical. A layout needs to contain a full page skeleton (
<html>,<head>, meta tags,{{ content }},<body>, and so on), and Markdown's shorthand syntax doesn't have equivalents for most of that, you'd just end up writing raw HTML inside a.mdfile anyway. Keep layouts as.liquidor.html. - HTML file as a post? This one genuinely works fine. Since
.htmlfiles get the same Liquid + front matter processing as.liquidfiles, you could write a post asmy-post.htmlinstead ofmy-post.md. The tradeoff: you lose Markdown's shorthand, no automatic paragraph wrapping, no#headings, you'd be writing every<p>and<h2>tag by hand. That's why long-form prose content (posts, gallery captions) uses.mdin this tutorial, and structural, markup-heavy files (layouts, index pages) use.liquid. It's a convenience choice, not a hard rule.
4. Navigation and Layouts
- Install the navigation plugin Run this in your terminal, stop the server first with Ctrl+c (Cmd+c for Mac users):
npm install --save-dev @11ty/eleventy-navigation
- Replace the content in
eleventy.config.jswith this:
const eleventyNavigationPlugin = require("@11ty/eleventy-navigation");

module.exports = function (eleventyConfig) {
  eleventyConfig.addPlugin(eleventyNavigationPlugin);

  return {
    dir: {
      input: "src",
      includes: "_includes",
      data: "_data",
      output: "_site",
    },
  };
};
Now create these files.
src/_includes/layouts/base.liquid:
<!DOCTYPE html>
<html lang="en">
<head>
<meta charset="UTF-8">
<meta name="viewport" content="width=device-width, initial-scale=1">
<title>{{ title }} - {{ site.title }}</title>
<meta name="description" content="{{ description | default: site.description }}">
<link rel="stylesheet" href="/css/style.css">
</head>
<body>
<header>
<a href="/" class="site-title">{{ site.title }}</a>
<nav>
{{ collections.all | eleventyNavigation | eleventyNavigationToHtml }}
</nav>
</header>
<main>
{{ content }}
</main>
<footer>
<p>© {{ "now" | date: "%Y" }} {{ site.title }}</p>
</footer>
<script src="/js/main.js" defer></script>
</body>
</html>
src/_includes/layouts/post.liquid (a layout that itself uses base.liquid):
---
layout: layouts/base.liquid
---
<article>
  <h1>{{ title }}</h1>
  <time datetime="{{ date | date: '%Y-%m-%d' }}">{{ date | date: '%B %d, %Y' }}</time>

  {{ content }}

  {% if tags %}
  <ul class="post-tags">
    {% for t in tags %}
      {% unless t == "posts" %}
      <li><a href="/tags/{{ t | slugify }}/">{{ t }}</a></li>
      {% endunless %}
    {% endfor %}
  </ul>
  {% endif %}
</article>
5. Your First Pages
src/index.liquid:
The block between the two --- lines below is called front matter, a small chunk of YAML (a simple, indentation-based data format) that sets metadata for this specific page: its title, which layout wraps it, and so on. Everything after the closing --- is the page's actual visible content.
---
title: Home
layout: layouts/base.liquid
eleventyNavigation:
  key: Home
  order: 1
---
<h1>Welcome to my blog</h1>
<p>This is the home page.</p>
src/about.liquid:
---
title: About
layout: layouts/base.liquid
eleventyNavigation:
  key: About
  order: 3
---
<h1>About</h1>
<p>A bit about who writes this blog.</p>
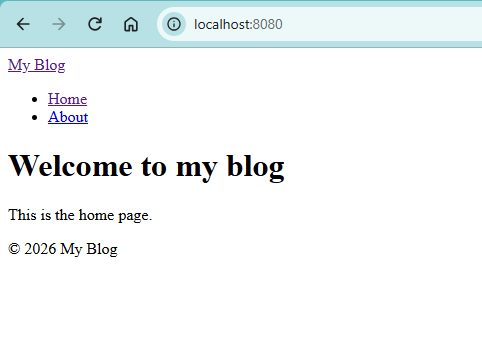
Start the server with npm start. You should see a basic menu with Home and About.
6. How the Navigation Works
You already set up the navigation in the previous steps. When you click between Home and About in your browser, notice that the menu stays visible at the top of each page.
Here is the two-step mechanism that makes this work:
- Pages register themselves: You do not build menus by manually hardcoding HTML links. Instead, when you add an
eleventyNavigationblock in its front matter (as we did inindex.liquidandabout.liquid). That registers the page into Eleventy's internal navigation list. - The layout renders the menu: In
src/_includes/layouts/base.liquid, this single line inside<nav>automatically reads all registered pages and converts them into HTML<ul>and<li>links:
{{ collections.all | eleventyNavigation | eleventyNavigationToHtml }}
Remember that base.liquid is a shell layout template, not a page you visit directly in your browser. Because index.liquid and about.liquid both use layout: layouts/base.liquid, Eleventy wraps their content with this shell during the build, giving every page the exact same menu automatically.
Docs: Navigation plugin
7. CSS, JS, and Static Assets
Right now the site is without style and formatting. Let's add that now.
It's easy to assume that once you write <link rel="stylesheet" href="/css/style.css"> in base.liquid, you're done, the browser knows where the file is, so surely it just works. That link tag, though, only tells the browser where to fetch the file from once your page loads; it doesn't tell Eleventy to put that file there in the first place.
Here's the actual mental model: when Eleventy builds your site, it walks through everything in src/, and for each file, it asks "is this one of my recognized template types (.liquid, .md, and so on)?" If yes, it processes that file and writes the result into _site/. If no, and you haven't said anything else about it, Eleventy just ignores it entirely, it never gets copied anywhere. A plain .css or .js file isn't a template Eleventy knows how to process, so left alone, it simply never makes it into _site/. Your <link> tag would end up pointing at a URL that returns a 404, both in your local preview and once deployed, because nothing ever created that file in the output folder.
Passthrough copy is the fix: it tells Eleventy "don't process this, just copy it into the output folder as-is."
Create the folders src/css, src/js, src/images and add the respective files.
First we create the file:
src/css/style.css (a small starting point):
:root {
  color-scheme: light dark;
  --max-width: 42rem;
}

body {
  margin: 0 auto;
  padding: 2rem 1rem;
  max-width: var(--max-width);
  font-family: system-ui, sans-serif;
  line-height: 1.6;
}

nav ul {
  display: flex;
  gap: 1rem;
  list-style: none;
  padding: 0;
}

.post-tags {
  display: flex;
  gap: 0.5rem;
  list-style: none;
  padding: 0;
}
Now, Add these lines to eleventy.config.js:
eleventyConfig.addPassthroughCopy("src/css");
eleventyConfig.addPassthroughCopy("src/js");
eleventyConfig.addPassthroughCopy("src/images");
Eleventy 3 automatically detects changes to eleventy.config.js and reloads, but restarting (Ctrl+C then npm start) is recommended whenever adding passthrough copies so the file watchers bind cleanly.
Also, make sure the addPassthroughCopy calls are placed inside the function before the return statement, rather than outside at the bottom where eleventyConfig is undefined. Your config should look like this:
const eleventyNavigationPlugin = require("@11ty/eleventy-navigation");

module.exports = function (eleventyConfig) {
  eleventyConfig.addPlugin(eleventyNavigationPlugin);

  eleventyConfig.addPassthroughCopy("src/css");
  eleventyConfig.addPassthroughCopy("src/js");
  eleventyConfig.addPassthroughCopy("src/images");

  return {
    dir: {
      input: "src",
      includes: "_includes",
      data: "_data",
      output: "_site",
    },
  };
};
Also create an empty file:
src/js/main.js it can stay empty for now, just wired up for later.
Optional step: Sass. Eleventy doesn't compile Sass by default, but you can register .scss as a first-class template language:
npm install sass
Add this to your eleventy.config.js (this is an addition to what you already have):
Put the require statements (sass and node:path) to the top of the file.
const sass = require("sass");
const path = require("node:path");
Add addTemplateFormats and addExtension lines after addPassthroughCopy. Your config should look like this:
const eleventyNavigationPlugin = require("@11ty/eleventy-navigation");
const sass = require("sass");
const path = require("node:path");

module.exports = function (eleventyConfig) {
  eleventyConfig.addPlugin(eleventyNavigationPlugin);

  eleventyConfig.addPassthroughCopy("src/css");
  eleventyConfig.addPassthroughCopy("src/js");
  eleventyConfig.addPassthroughCopy("src/images");

  // Sass compilation
  eleventyConfig.addTemplateFormats("scss");
  eleventyConfig.addExtension("scss", {
    outputFileExtension: "css",
    compile: function (inputContent, inputPath) {
      let parsed = path.parse(inputPath);
      if (parsed.name.startsWith("_")) return; // skip partials like _variables.scss

      let result = sass.compileString(inputContent, {
        loadPaths: [parsed.dir || ".", this.config.dir.includes],
      });

      return () => result.css;
    },
  });

  return {
    dir: {
      input: "src",
      includes: "_includes",
      data: "_data",
      output: "_site",
    },
  };
};
After this change when you start the server the css should apply and the site should look like this:

Docs: Copy Files to Output, Sass
8. Blog Posts & Collections
A collection is Eleventy's word for a group of related pages you can loop over as a list, in our case, every blog post. You build one by giving a group of files a shared tag; Eleventy automatically gathers everything sharing that tag into collections.<tagname>, sorted by date by default. Give a file tags: ["posts"], and it joins collections.posts automatically, no extra registration needed.
One more term worth defining before we go further: a permalink is simply the final web address (URL) a page will live at once your site is built, for example https://yoursite.com/blog/my-first-post/. By default, Eleventy works this out automatically from where a file sits inside your src folder (a file at src/posts/my-first-post.md would normally become /posts/my-first-post/). You can override that default and hand Eleventy an exact URL pattern to use instead, that's what the permalink field you'll see below does: it tells every post in this folder to use /blog/... instead of the automatic /posts/....
Now, the setup. Create src/posts/posts.11tydata.js, a directory data file, a small settings file that automatically applies to every file inside its own folder, through something Eleventy calls the Data Cascade (settings can be defined at different levels, global, folder, or individual page, and more specific settings override broader ones). We're using a .js file here instead of .json so it can carry more advanced logic later on. Inside of it add this code:
module.exports = {
  layout: "layouts/post.liquid",
  tags: ["posts"],
  permalink: "/blog/{{ page.fileSlug }}/",
};
Change that permalink pattern once, here, and every post in the folder updates, no per-file edits needed. The tags value merges with whatever tags an individual post adds (Eleventy treats tags as a special, mergeable key across the cascade), so posts can add their own category tags without losing posts.
Create the file:
src/posts/my-first-post.md:
---
title: My First Post
date: 2026-01-15
description: Kicking off the blog with a short introduction.
tags:
  - eleventy
  - javascript
---
This is the body of my first post, written in Markdown. Front matter and
Liquid tags both work inside `.md` files by default.
src/posts/a-second-post.md:
---
title: A Second Post
date: 2026-01-22
description: A follow-up post to test collections and pagination.
tags:
  - eleventy
---
Some more content here.
src/blog.liquid (a simple listing for now, paginated version comes in the next section):
---
title: Blog
layout: layouts/base.liquid
eleventyNavigation:
  key: Blog
  order: 2
---
<h1>Blog</h1>
<ul>
  {% for post in collections.posts reversed %}
  <li>
    <a href="{{ post.url }}">{{ post.data.title }}</a>
    <time datetime="{{ post.date | date: '%Y-%m-%d' }}">{{ post.date | date: '%B %d, %Y' }}</time>
  </li>
  {% endfor %}
</ul>
src/blog.liquid creates a new page at http://localhost:8080/blog/
The only difference on the root page is in the navigation menu, which now includes a Blog link between Home and About because order: 2 places it in the middle.
Click Blog in the menu or navigate to http://localhost:8080/blog/ to view the post listing.
Caution: On Windows, Eleventy's watcher often misses newly created files until a restart. While testing this tutorial on Windows, I experience a bug where blog didn't show up in the navigation even aftr a hard refresh until I restarted the server.
Next, we'll make that listing paginated, adding page 2, page 3, etc., automatically once the list grows long enough. But before we do, here are the links for the official docs:
Docs: Collections, Content Dates
9. Post Pages: Custom URLs, Prev/Next, and Pagination
You already saw the custom permalink pattern in the previous section, the permalink field in posts.11tydata.js. Every post in src/posts/ picks it up automatically.
Previous/Next links, added inside src\_includes\layouts\post.liquid at the bottom of the file:
{% assign nextPost = collections.posts | getNextCollectionItem: page %}
{% assign prevPost = collections.posts | getPreviousCollectionItem: page %}
<nav class="post-nav">
{% if prevPost %}<a href="{{ prevPost.url }}">← {{ prevPost.data.title }}</a>{% endif %}
{% if nextPost %}<a href="{{ nextPost.url }}">{{ nextPost.data.title }} →</a>{% endif %}
</nav>
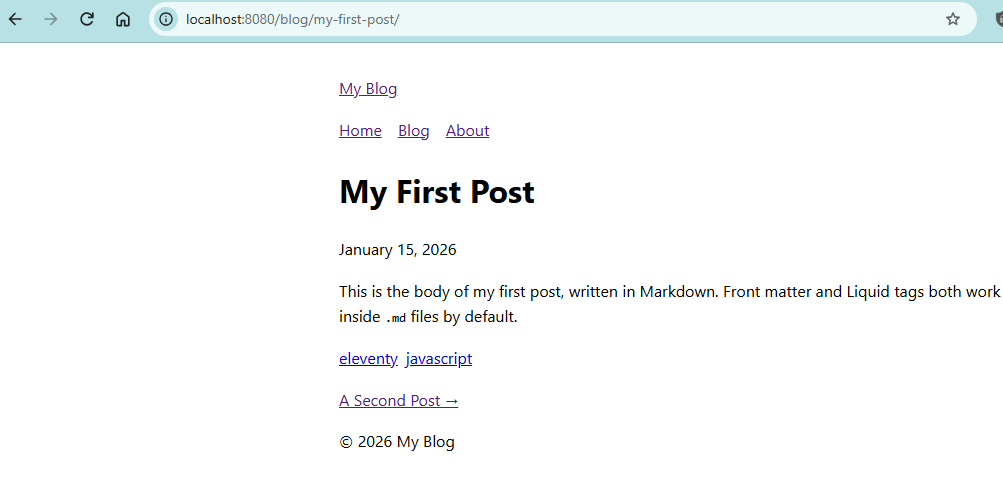
Blog should now look like this in the browser:
Pagination, meaning splitting a long list of posts across several pages instead of one giant page, replacing the simple listing in blog.liquid with a paginated one (10 posts per page). Replace src/blog.liquid with this code:
---
title: Blog
layout: layouts/base.liquid
eleventyNavigation:
  key: Blog
  order: 2
pagination:
  data: collections.posts
  size: 10
  reverse: true
  alias: pagePosts
---
<h1>Blog</h1>
<ul>
  {% for post in pagePosts %}
  <li><a href="{{ post.url }}">{{ post.data.title }}</a></li>
  {% endfor %}
</ul>

<nav class="pager">
  {% if pagination.href.previous %}<a href="{{ pagination.href.previous }}">Newer posts</a>{% endif %}
  {% if pagination.href.next %}<a href="{{ pagination.href.next }}">Older posts</a>{% endif %}
</nav>
Note on testing pagination: Because we only have two posts right now, both fit within size: 10. Eleventy only renders the "Newer posts" and "Older posts" links when there is an actual next or previous page, so the <nav class="pager"> block will appear empty for now. To test and see the pagination links immediately, temporarily change size: 10 to size: 1 so each post gets its own page.
Left without a custom permalink of its own, Eleventy paginates using this template's own path automatically: /blog/, /blog/1/, /blog/2/, and so on. You'll see this in action after we add more posts.
Docs: Permalinks, Pagination, get*CollectionItem filters
10. Images
Run this command to install the plugin:
npm install --save-dev @11ty/eleventy-img
We're going to wrap this plugin in a shortcode, a small reusable snippet you can call by name inside a template, similar to a function, that outputs a chunk of HTML. Instead of hand-writing a large, multi-size <picture> element every time you place an image, you define the logic once here, then just write {% image ... %} wherever you need it.
Add the shortcode in eleventy.config.js:
const Image = require("@11ty/eleventy-img");

eleventyConfig.addAsyncShortcode(
  "image",
  async function (src, alt, sizes = "100vw") {
    if (!alt) {
      throw new Error(`Missing \`alt\` text for image: ${src}`);
    }

    return Image(src, {
      widths: [400, 800, 1200],
      formats: ["avif", "webp", "jpeg"],
      outputDir: "./_site/images/",
      urlPath: "/images/",
      returnType: "html",
      htmlOptions: {
        imgAttributes: {
          alt,
          sizes,
          loading: "lazy",
          decoding: "async",
        },
      },
    });
  }
);
Use it in Markdown or Liquid:
{% image "./src/images/hero.jpg", "A sunrise over the mountains" %}
Note: Liquid shortcodes only accept positional arguments (values passed in order, not named options), so if you want to override widths or formats per call, add more positional parameters to the shortcode function rather than passing an options object.
Docs: Image plugin, Shortcodes
11. Categories & Tags
Generate a de-duplicated tag list as its own collection:
eleventyConfig.addCollection("tagList", function (collectionApi) {
  const tagSet = new Set();
  collectionApi.getAll().forEach((item) => {
    (item.data.tags || []).forEach((tag) => tagSet.add(tag));
  });

  // Structural tags that shouldn't show up as browsable categories
  ["posts", "gallery", "all", "nav"].forEach((tag) => tagSet.delete(tag));

  return [...tagSet];
});
src/tags.liquid, one page per tag via pagination over that collection:
---
layout: layouts/base.liquid
pagination:
data: collections.tagList
size: 1
alias: tag
permalink: "/tags/{{ tag | slugify }}/"
---
<h1>Posts tagged “{{ tag }}”</h1>
<ul>
{% for post in collections.posts %}
{% if post.data.tags contains tag %}
<li><a href="{{ post.url }}">{{ post.data.title }}</a></li>
{% endif %}
{% endfor %}
</ul>
Update the <title> line in base.liquid so it falls back to the tag name on pages, like this one, that don't set an explicit title:
<title>{{ title | default: tag }} - {{ site.title }}</title>
Each post already links out to its own tags via the tag list added to post.liquid back in Section 5.
Docs: Collections, Pagination, slugify
Checkpoint: You Have a Working Blog
At this point, you have a fully working blog: a homepage, an about page, a navigation menu, a blog section with posts, custom URLs, next/previous links, a paginated listing, images, and tag/category pages. If that's everything you need, a simple, working blog with posts and a couple of static pages, you can stop right here. Part 2 below is a menu of optional add-ons; none of it is required for a complete, working site.
If you do want to put this online now rather than adding anything else first, skip ahead to the Deployment section near the end of Part 2, everything else there is optional and skippable.
Here's the complete eleventy.config.js as it stands at this checkpoint, useful to double check your own file against:
const eleventyNavigationPlugin = require("@11ty/eleventy-navigation");
const Image = require("@11ty/eleventy-img");

module.exports = function (eleventyConfig) {
  eleventyConfig.addPlugin(eleventyNavigationPlugin);

  eleventyConfig.addPassthroughCopy("src/css");
  eleventyConfig.addPassthroughCopy("src/js");
  eleventyConfig.addPassthroughCopy("src/images");

  eleventyConfig.addAsyncShortcode(
    "image",
    async function (src, alt, sizes = "100vw") {
      if (!alt) {
        throw new Error(`Missing \`alt\` text for image: ${src}`);
      }
      return Image(src, {
        widths: [400, 800, 1200],
        formats: ["avif", "webp", "jpeg"],
        outputDir: "./_site/images/",
        urlPath: "/images/",
        returnType: "html",
        htmlOptions: {
          imgAttributes: { alt, sizes, loading: "lazy", decoding: "async" },
        },
      });
    }
  );

  eleventyConfig.addCollection("tagList", function (collectionApi) {
    const tagSet = new Set();
    collectionApi.getAll().forEach((item) => {
      (item.data.tags || []).forEach((tag) => tagSet.add(tag));
    });
    // "gallery" isn't used yet, it's reserved for Part 2's gallery collection
    ["posts", "gallery", "all", "nav"].forEach((tag) => tagSet.delete(tag));
    return [...tagSet];
  });

  return {
    dir: {
      input: "src",
      includes: "_includes",
      data: "_data",
      output: "_site",
    },
  };
};
Part 2: Optional Enhancements
Part 1 gives you a fully functional, production-ready static blog. Part 2 is an optional menu of features you can add to tailor the site to your needs. Every section below is self-contained: pick the features that fit your workflow, implement them in any order, and skip whatever you don't need.
1. A Separate Content Type: Gallery Collection
Most blogs eventually need more than just standard text articles. You might want to publish photo journals, project portfolios, podcasts, or book reviews. In Eleventy, creating a second content type is as simple as creating a new folder and tagging its items with a different collection name.
Instead of writing custom JavaScript queries or database schemas, Eleventy relies on its Data Cascade to handle folder-level defaults.
Step 1: Set folder-wide defaults with src/gallery/gallery.json.
Create a JSON file inside src/gallery/ with the exact name gallery.json. In Eleventy, a JSON file named after its parent directory acts as a directory data file, automatically applying its properties to every template inside that folder:
{
  "layout": "layouts/gallery.liquid",
  "tags": ["gallery"],
  "permalink": "/gallery/{{ page.fileSlug }}/"
}
"layout": "layouts/gallery.liquid"ensures every markdown file insidesrc/gallery/automatically uses the gallery layout without needing to declare it in every post's front matter."tags": ["gallery"]adds every item in this directory tocollections.gallery. Because these files carry thegallerytag instead ofposts, they will not appear in your main blog listing or blog RSS feed unless you explicitly query them."permalink": "/gallery/{{ page.fileSlug }}/"forces custom URLs starting with/gallery/instead of/posts/or raw file paths.
Step 2: Build the individual gallery layout.
Create src/_includes/layouts/gallery.liquid:
---
layout: layouts/base.liquid
---
<article class="gallery-item">
  <h1>{{ title }}</h1>
  {% if image %}
    {% image image, title %}
  {% endif %}
  <div class="gallery-content">
    {{ content }}
  </div>
</article>
This layout inherits from base.liquid, meaning it keeps your site header, navigation menu, and footer intact while wrapping your gallery item in custom HTML markup. Notice how we pass the front matter image field straight to the {% image %} shortcode we built in Part 1.
Step 3: Create a sample gallery item.
Create src/gallery/sunset-hike.md:
---
title: Sunset at Half Dome
date: 2026-02-01
image: ./src/images/gallery/sunset-hike.jpg
---
A short photo log from our evening hike up the peak. The weather held up perfectly right until sunset.
Because of gallery.json, this page automatically joins collections.gallery, gets the URL /gallery/sunset-hike/, and uses gallery.liquid as its layout.
Step 4: Create the Gallery index page.
Create src/gallery.liquid at src/gallery.liquid (note that this file sits inside src/ right next to the gallery/ folder):
---
title: Gallery
layout: layouts/base.liquid
eleventyNavigation:
  key: Gallery
  order: 4
---
<h1>Photo Gallery</h1>
<div class="gallery-grid">
  {% for item in collections.gallery reversed %}
  <div class="gallery-card">
    <a href="{{ item.url }}">
      {% if item.data.image %}
        {% image item.data.image, item.data.title %}
      {% endif %}
      <h2>{{ item.data.title }}</h2>
    </a>
  </div>
  {% endfor %}
</div>
Because these files are tagged gallery instead of posts, they live in collections.gallery, entirely separate from collections.posts, your RSS feed, and your blog index, unless you explicitly pull them in. This same pattern works for any other content type you want to add later (notes, projects, recipes).
collections.gallery gives you an array of all items tagged gallery. Adding reversed displays the newest photos first. This pattern can be repeated for any content type you want to introduce, such as /projects/ or /notes/.
Docs: Collections, Directory Data Files
2. Computed Data & Draft Posts
When writing articles, you often want to save unfinished drafts in your project folder without having them published to the live site.
Eleventy provides a feature called Computed Data (eleventyComputed), which lets you dynamically calculate front matter properties using JavaScript functions at build time. Computed data lets you calculate a value with a small JavaScript function instead of hardcoding it, so it can depend on other data (like whether a post is marked as a draft) and gets recalculated correctly every time the site builds.
We can use this to inspect a draft: true flag in a post's front matter and tell Eleventy not to output the file.
Open src/posts/posts.11tydata.js and update it to the following:
module.exports = {
  layout: "layouts/post.liquid",
  tags: ["posts"],
  eleventyComputed: {
    permalink: (data) => {
      // If draft is set to true in front matter, suppress page output
      if (data.draft) {
        return false;
      }
      return `/blog/${data.page.fileSlug}/`;
    },
    eleventyExcludeFromCollections: (data) => {
      // If draft is true, also exclude it from all collections (feed, sitemap, listings)
      if (data.draft) {
        return true;
      }
      return data.eleventyExcludeFromCollections;
    },
  },
};
How this works under the hood:
- Setting
permalink: falsetells Eleventy: "Do not write an HTML file for this document into the_sitedirectory." - Returning
eleventyExcludeFromCollections: truetells Eleventy: "Do not include this document incollections.all,collections.posts, or any tag listings."
Now, whenever you start a new post, just add draft: true to its front matter:
---
title: Working on a New Feature
date: 2026-03-10
draft: true
---
This post is still a work in progress. It won't be built into `_site` or appear in your RSS feed.
When you are ready to publish, either remove the draft line or set draft: false.
Docs: Computed Data, Data Cascade
3. RSS & Atom Web Feeds
An RSS or Atom feed is an XML file that lets readers subscribe to your blog using news reader applications like Feedly, Inoreader, or NetNewsWire. Whenever you publish a new article, feed readers fetch this file and notify your audience automatically.
Eleventy 3 provides an official RSS plugin with a Virtual Template feature. Instead of hand-coding complex XML loops, the plugin generates a compliant feed file directly from your configuration.
Step 1: Install the RSS plugin.
npm install @11ty/eleventy-plugin-rss
Step 2: Register the plugin in eleventy.config.js.
const { feedPlugin } = require("@11ty/eleventy-plugin-rss");

module.exports = function (eleventyConfig) {
  // Register the RSS/Atom feed plugin
  eleventyConfig.addPlugin(feedPlugin, {
    type: "atom", // Options: "atom", "rss", or "json"
    outputPath: "/feed.xml",
    collection: {
      name: "posts", // Collects items from collections.posts
      limit: 10,     // Only include the 10 most recent posts (0 = no limit)
    },
    metadata: {
      language: "en",
      title: "My Blog",
      subtitle: "Thoughts on code, web development, and technology.",
      base: "https://example.com/",
      author: {
        name: "Your Name",
      },
    },
  });
};
Step 3: Enable feed auto-discovery in base.liquid.
Add an auto-discovery <link> tag inside the <head> section of src/_includes/layouts/base.liquid:
<link rel="alternate" type="application/atom+xml" href="/feed.xml" title="{{ site.title }}">
Feed reader apps and browser extensions check for this tag when a user enters your website URL, allowing one-click subscriptions. You can also add a visible RSS link in your page footer:
<footer>
<p>© {{ "now" | date: "%Y" }} {{ site.title }}. <a href="/feed.xml">RSS Feed</a></p>
</footer>
If you need full control over the markup instead, the docs also cover a Manual Template method where you hand-author the XML yourself: RSS plugin docs.
4. XML Sitemap for Search Engines
An XML sitemap is a single file listing every page on your site along with its own address. Search engines like Google read this file so they reliably know about, and can properly index, every page on your site, especially useful for pages that aren't well linked to from anywhere else.
No official Eleventy plugin here.
Unlike feeds, an XML sitemap is best generated with a simple Liquid template iterating over collections.all.
Create src/sitemap.liquid:
---
permalink: /sitemap.xml
eleventyExcludeFromCollections: true
---
<?xml version="1.0" encoding="UTF-8"?>
<urlset xmlns="http://www.sitemaps.org/schemas/sitemap/0.9">
  {% for entry in collections.all %}
    {% unless entry.data.draft %}
    <url>
      <loc>{{ site.url }}{{ entry.url }}</loc>
      {% if entry.date %}
      <lastmod>{{ entry.date | date: "%Y-%m-%d" }}</lastmod>
      {% endif %}
    </url>
    {% endunless %}
  {% endfor %}
</urlset>
Why this works cleanly:
permalink: /sitemap.xmlensures the output is saved to the root of your built site.eleventyExcludeFromCollections: trueprevents the sitemap itself from being listed insidecollections.all.collections.allgrabs every generated page (posts, static pages, tag archives).{% unless entry.data.draft %}ensures no draft URLs leak into search engines.
Once your site is deployed, you can submit https://yourdomain.com/sitemap.xml to Google Search Console.
Docs: Sitemaps Protocol
5. Client-Side On-Site Search with Pagefind
Traditional dynamic blogs rely on server databases (like MySQL) to execute SQL queries for on-site search. Static sites don't have a backend database running, but you can achieve instant, zero-server search using Pagefind.
Pagefind is a static search library built specifically for static site generators. After Eleventy finishes building your static HTML files into _site/, Pagefind scans the compiled HTML, builds a compressed WebAssembly search index, and provides a pre-styled search UI widget.
Step 1: Install Pagefind.
npm install --save-dev pagefind
Step 2: Update your build command in package.json.
Modify your "build" script inside package.json so Pagefind indexes _site right after Eleventy finishes building:
{
  "scripts": {
    "start": "npx @11ty/eleventy --serve",
    "build": "npx @11ty/eleventy && npx pagefind --site _site"
  }
}
Step 3: Add the search interface to your site.
You can create a dedicated search page at src/search.liquid or embed search directly into a sidebar or modal:
---
title: Search
layout: layouts/base.liquid
eleventyNavigation:
  key: Search
  order: 5
---
<h1>Search Articles</h1>

<!-- Pagefind styles and UI bundle -->
<link href="/pagefind/pagefind-ui.css" rel="stylesheet">
<script src="/pagefind/pagefind-ui.js"></script>

<div id="search-container"></div>

<script>
  window.addEventListener("DOMContentLoaded", () => {
    new PagefindUI({
      element: "#search-container",
      showImages: false,
      resetFilters: true
    });
  });
</script>
Important Dev Server Note: Pagefind runs during npm run build when indexing the compiled static files. While developing locally with npm start, Pagefind's index is not regenerated on every file save. To test search locally, run npm run build first.
Docs: Pagefind Documentation
6. Related Posts Algorithm
Keep readers engaged by showing a list of related articles at the end of each post based on shared tags.
We can implement this by adding a custom JavaScript filter to eleventy.config.js.
Step 1: Register the relatedPosts filter in eleventy.config.js.
module.exports = function (eleventyConfig) {
  // Custom filter to find articles with matching tags
  eleventyConfig.addFilter("relatedPosts", function (allPosts, currentUrl, currentTags, limit = 3) {
    if (!currentTags || !Array.isArray(currentTags)) return [];

    // Ignore generic organizational tags
    const ignoredTags = new Set(["posts", "all", "nav", "gallery"]);
    const activeTags = new Set(currentTags.filter((tag) => !ignoredTags.has(tag)));

    if (activeTags.size === 0) return [];

    return allPosts
      .filter((post) => post.url !== currentUrl && !post.data.draft)
      .map((post) => {
        const postTags = post.data.tags || [];
        const matchCount = postTags.filter((tag) => activeTags.has(tag)).length;
        return { post, score: matchCount };
      })
      .filter((item) => item.score > 0)
      .sort((a, b) => b.score - a.score)
      .slice(0, limit)
      .map((item) => item.post);
  });
};
Step 2: Render related posts in src/_includes/layouts/post.liquid.
Add this section near the bottom of your post layout:
{% assign related = collections.posts | relatedPosts: page.url, tags, 3 %}

{% if related.size > 0 %}
<section class="related-posts">
  <h3>Related Articles</h3>
  <ul>
    {% for item in related %}
    <li>
      <a href="{{ item.url }}">{{ item.data.title }}</a>
      <time datetime="{{ item.date | date: '%Y-%m-%d' }}">{{ item.date | date: '%B %d, %Y' }}</time>
    </li>
    {% endfor %}
  </ul>
</section>
{% endif %}
The filter compares the current article's tags against all other posts, calculates an overlap score, orders the matches by relevance, and displays up to 3 recommendations.
Docs: Custom Filters
7. Search Engine Optimization (SEO) & JSON-LD
Good SEO ensures your blog posts display attractive preview cards when shared on Twitter, LinkedIn, or messaging apps, and helps search engines understand your content structure.
We can combine Open Graph metadata with JSON-LD Structured Data.
Part A: Social Meta Tags with eleventy-plugin-seo
Install the plugin:
npm install eleventy-plugin-seo
Register it in eleventy.config.js:
const pluginSEO = require("eleventy-plugin-seo");
const siteData = require("./src/_data/site.json");

module.exports = function (eleventyConfig) {
  eleventyConfig.addPlugin(pluginSEO, {
    title: siteData.title,
    description: siteData.description,
    url: siteData.url,
    author: siteData.author,
    twitter: siteData.twitterHandle || "",
  });
};
Include the {% seo %} tag inside the <head> section of src/_includes/layouts/base.liquid:
<head>
  <meta charset="UTF-8">
  <meta name="viewport" content="width=device-width, initial-scale=1">
  {% seo %}
  <link rel="stylesheet" href="/css/style.css">
</head>
This tag generates your page <title>, <meta name="description">, <link rel="canonical">, Open Graph tags (og:title, og:image), and Twitter Card meta tags automatically.
Part B: JSON-LD Structured Data for Google
JSON-LD (JavaScript Object Notation for Linked Data) is a standardized format that provides search engines with explicit information about a page's type (e.g., a news article, blog post, or recipe).
First, register a JSON serialization filter in eleventy.config.js:
eleventyConfig.addFilter("jsonify", (value) => JSON.stringify(value));
Next, create src/_includes/partials/jsonld.liquid:
<script type="application/ld+json">
{
  "@context": "https://schema.org",
  "@type": "BlogPosting",
  "headline": {{ title | jsonify }},
  "description": {{ description | default: site.description | jsonify }},
  "datePublished": "{{ date | date: '%Y-%m-%dT%H:%M:%S%z' }}",
  "author": {
    "@type": "Person",
    "name": {{ author | default: site.author | jsonify }}
  },
  "url": "{{ site.url }}{{ page.url }}"
}
</script>
Include this partial inside src/_includes/layouts/post.liquid:
{% include "partials/jsonld.liquid" %}
Search engines inspect this block to display rich snippets, author names, and publish dates directly in Google Search results.
Docs: Schema.org BlogPosting
8. Build-Time Syntax Highlighting for Code Blocks
If you write about code, you want fenced code blocks (python ... ) to display clean syntax colors.
Rather than loading heavy client-side JavaScript libraries (like Highlight.js or Rainbow.js) in the reader's browser, Eleventy can perform syntax highlighting at build time using Prism.js. The generated HTML contains static color spans, resulting in zero performance overhead for visitors.
Step 1: Install the official syntax highlighting plugin.
npm install --save-dev @11ty/eleventy-plugin-syntaxhighlight
Step 2: Register the plugin in eleventy.config.js.
const syntaxHighlight = require("@11ty/eleventy-plugin-syntaxhighlight");

module.exports = function (eleventyConfig) {
  eleventyConfig.addPlugin(syntaxHighlight);
};
Step 3: Add a Prism CSS theme.
Download any standard Prism CSS theme (such as Prism Tomorrow Dark) or include a stylesheet link in base.liquid:
<link rel="stylesheet" href="https://cdnjs.cloudflare.com/ajax/libs/prism/1.29.0/themes/prism-tomorrow.min.css">
Now, any fenced code block in Markdown posts formats automatically:
```javascript
function greet(name) {
  console.log(`Hello, ${name}!`);
}
Docs: [Eleventy Syntax Highlighting Plugin](https://www.11ty.dev/docs/plugins/syntaxhighlight/)

***

## 9. Deploying Your Site to Production

Because Eleventy compiles your source files into flat static HTML, CSS, and assets inside the `_site/` directory, you can host your site anywhere without needing a Node.js server environment.

### Deployment Configuration Summary

For almost all modern hosting platforms (GitHub Pages, Netlify, Vercel, Cloudflare Pages), the configuration requires only two settings:

- **Build Command:** `npm run build`
- **Output Directory:** `_site`

### Platform Setup Guides

#### Option A: GitHub Pages (Free)

1. Push your project to a GitHub repository.
2. In your repository settings, navigate to **Pages**.
3. Under **Source**, select **GitHub Actions**.
4. Choose the default **Static HTML** or **Eleventy** workflow template. GitHub will automatically build and publish your `_site` directory every time you push code to `main`.

#### Option B: Netlify

1. Connect your GitHub repository to Netlify.
2. Set Build Command to `npm run build`.
3. Set Publish Directory to `_site`.
4. Click **Deploy Site**.

#### Option C: Vercel

1. Import your GitHub repository into Vercel.
2. Vercel automatically detects Eleventy.
3. Verify that the Output Directory is set to `_site` and click **Deploy**.

***

## The Complete `eleventy.config.js` File

Here is the complete, production-ready `eleventy.config.js` file combining all configuration options from both Part 1 and Part 2:

```js
const eleventyNavigationPlugin = require("@11ty/eleventy-navigation");
const Image = require("@11ty/eleventy-img");
const { feedPlugin } = require("@11ty/eleventy-plugin-rss");
const pluginSEO = require("eleventy-plugin-seo");
const syntaxHighlight = require("@11ty/eleventy-plugin-syntaxhighlight");
const siteData = require("./src/_data/site.json");

module.exports = function (eleventyConfig) {
  // -------------------------------------------------------------
  // PLUGINS
  // -------------------------------------------------------------
  eleventyConfig.addPlugin(eleventyNavigationPlugin);
  eleventyConfig.addPlugin(syntaxHighlight);

  eleventyConfig.addPlugin(pluginSEO, {
    title: siteData.title,
    description: siteData.description,
    url: siteData.url,
    author: siteData.author,
  });

  eleventyConfig.addPlugin(feedPlugin, {
    type: "atom",
    outputPath: "/feed.xml",
    collection: { name: "posts", limit: 10 },
    metadata: {
      language: "en",
      title: siteData.title,
      subtitle: siteData.description,
      base: siteData.url,
      author: { name: siteData.author },
    },
  });

  // -------------------------------------------------------------
  // PASSTHROUGH COPY (Static Assets)
  // -------------------------------------------------------------
  eleventyConfig.addPassthroughCopy("src/css");
  eleventyConfig.addPassthroughCopy("src/js");
  eleventyConfig.addPassthroughCopy("src/images");

  // -------------------------------------------------------------
  // SHORTCODES (Responsive Images)
  // -------------------------------------------------------------
  eleventyConfig.addAsyncShortcode(
    "image",
    async function (src, alt, sizes = "100vw") {
      if (!alt) {
        throw new Error(`Missing \`alt\` text for image: ${src}`);
      }

      return Image(src, {
        widths: [400, 800, 1200],
        formats: ["avif", "webp", "jpeg"],
        outputDir: "./_site/images/",
        urlPath: "/images/",
        returnType: "html",
        htmlOptions: {
          imgAttributes: { alt, sizes, loading: "lazy", decoding: "async" },
        },
      });
    }
  );

  // -------------------------------------------------------------
  // CUSTOM COLLECTIONS
  // -------------------------------------------------------------
  eleventyConfig.addCollection("tagList", function (collectionApi) {
    const tagSet = new Set();
    collectionApi.getAll().forEach((item) => {
      (item.data.tags || []).forEach((tag) => tagSet.add(tag));
    });
    ["posts", "gallery", "all", "nav"].forEach((tag) => tagSet.delete(tag));
    return [...tagSet];
  });

  // -------------------------------------------------------------
  // CUSTOM FILTERS
  // -------------------------------------------------------------
  eleventyConfig.addFilter("jsonify", (value) => JSON.stringify(value));

  eleventyConfig.addFilter("relatedPosts", function (allPosts, currentUrl, currentTags, limit = 3) {
    if (!currentTags || !Array.isArray(currentTags)) return [];

    const ignoredTags = new Set(["posts", "all", "nav", "gallery"]);
    const activeTags = new Set(currentTags.filter((tag) => !ignoredTags.has(tag)));

    if (activeTags.size === 0) return [];

    return allPosts
      .filter((post) => post.url !== currentUrl && !post.data.draft)
      .map((post) => {
        const postTags = post.data.tags || [];
        const matchCount = postTags.filter((tag) => activeTags.has(tag)).length;
        return { post, score: matchCount };
      })
      .filter((item) => item.score > 0)
      .sort((a, b) => b.score - a.score)
      .slice(0, limit)
      .map((item) => item.post);
  });

  // -------------------------------------------------------------
  // DIRECTORY CONFIGURATION
  // -------------------------------------------------------------
  return {
    dir: {
      input: "src",
      includes: "_includes",
      data: "_data",
      output: "_site",
    },
  };
};
Wrap-Up
You now have a fast, fully customized static blog powered by Eleventy 3.x and Liquid. By keeping your site static, your blog loads instantaneously, costs practically nothing to host, and remains simple to maintain for years to come.
Appendix: A Note on Nunjucks
Throughout this guide, we used Liquid as our template engine. Eleventy also supports Nunjucks (another popular templating engine derived from Jinja2). While Liquid is standard across Jekyll and Shopify themes, Nunjucks offers advanced features like template macros and keyword arguments in shortcodes. If your project grows to require complex layout logic, switching or combining Nunjucks templates in Eleventy is seamless.
Up next: Part 7 of 7 in Building This Blog
Sveltia CMS is feature complete. Time to switch from Decap CMS
If you run a static site on Decap CMS (formerly Netlify CMS), Sveltia CMS created by Kyoshino has reached a decisive milestone. Several projects I maintain are handed over to...
Related Concepts & Posts
The following cards provide further definitions of concepts discussed above, and possible links to related posts.
Eleventy Official Site
Official documentation and guides for Eleventy (11ty) static site generator.
Visit 11ty.devLiquid Template Engine
Official reference for Liquid markup language used throughout this guide.
View Liquid DocsPagefind Search
Fast, zero-config static search library used for client-side search.
Visit Pagefind